(FIXED): Windows couldn't connect to the printer

Printers were designed to simplify tasks, and bring joy to our work cause everything can be handled without any kind of delay. But, things might get tough when, out of the blue, you get some errors that came out of nowhere. It frustrates right?

Maybe it is that project you are working on, your boss, or your coworkers are all depending on you to fix that printer printing problem.
Just,
Don't worry, I will guide you on how to solve an error as you see in the screenshot above. It doesn't matter what type of printer you are using, as long as your desktop, laptop, etc runs Windows, I got you covered. Follow these few easy steps and get back to work!
Here are four legit steps to follow and permanently fix the printing problem.
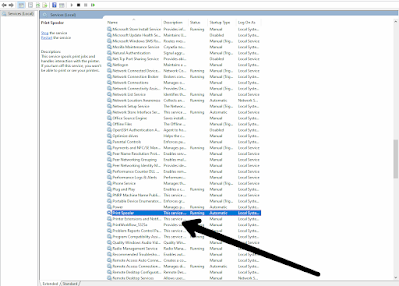
Step 01: Stop and restart the spooler service.
Search or go to your computer > Services

Then look for Print Spooler
Step 02: Change workgroup name.
Search, or go to > Workgroup
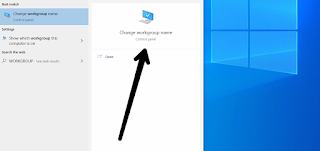
Click on it, after that, change its Domain, Computer, and Workgroup name.

You can name it whatever you wish, the point is to change names.
READ NEXT: Effects of having Plan B in business
Step 03: Uninstall Windows Updates
Go to the control panel, after you are there then click on Programs

Then, View installed updates

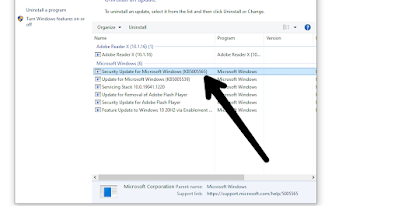
(It might not be the numbers you see but it won't be titled differently)
Then uninstall it.

After clicking on Uninstall, you gonna get asked if you sure about what you want to do, uninstalling an update! Just click yes.

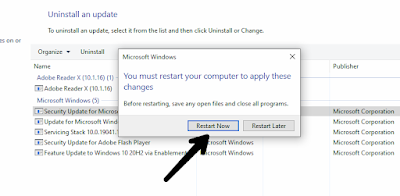
Step 04: Restart the computer
Once you click on yes, you will see this.

As how it says on the image above; wait for a couple minutes, when the updates are uninstalled, you gonna get a message that wants you to do two things, to Restart the computer or to Restart Later the process - just restart the computer to make changes you want.
And once your computer is back on, You are perfectly done. Go to Printers & Scanners to add your printer. Congratulations, you have finished setting up your printer. Happy printing!
</p>


Comments
Post a Comment